Getting Started with Static Website Generators
Kaitlin Newson (@kaitlinnewson), Digital Projects Librarian, Scholars Portal
Kim Pham (@tolloid), Digital Projects Librarian, University of Toronto Scarborough
Git repo: git.io/vALv2
Outline/Agenda
- Installing Hugo & troubleshooting
- Background - what are static site generators, and why should I use them?
- Markdown
- Hugo directory structure
- Create a starter site
- Break
- Exercises
- Other useful tools
- Discussion
Installation troubleshooting
What is a static website?
- Made up of HTML, CSS, & JavaScript
- No back-end scripting languages, databases, or CMS
- Displayed to user as it exists on the server
What is a static website generator?
- Template language & markup language
- Compiles into HTML/CSS files
- Built-in server for testing
- Many options - over 200 options on staticgen.com
- Most popular is Jekyll (built with Ruby), followed by Hugo (built with Go)
Examples
Code4Lib Conference site
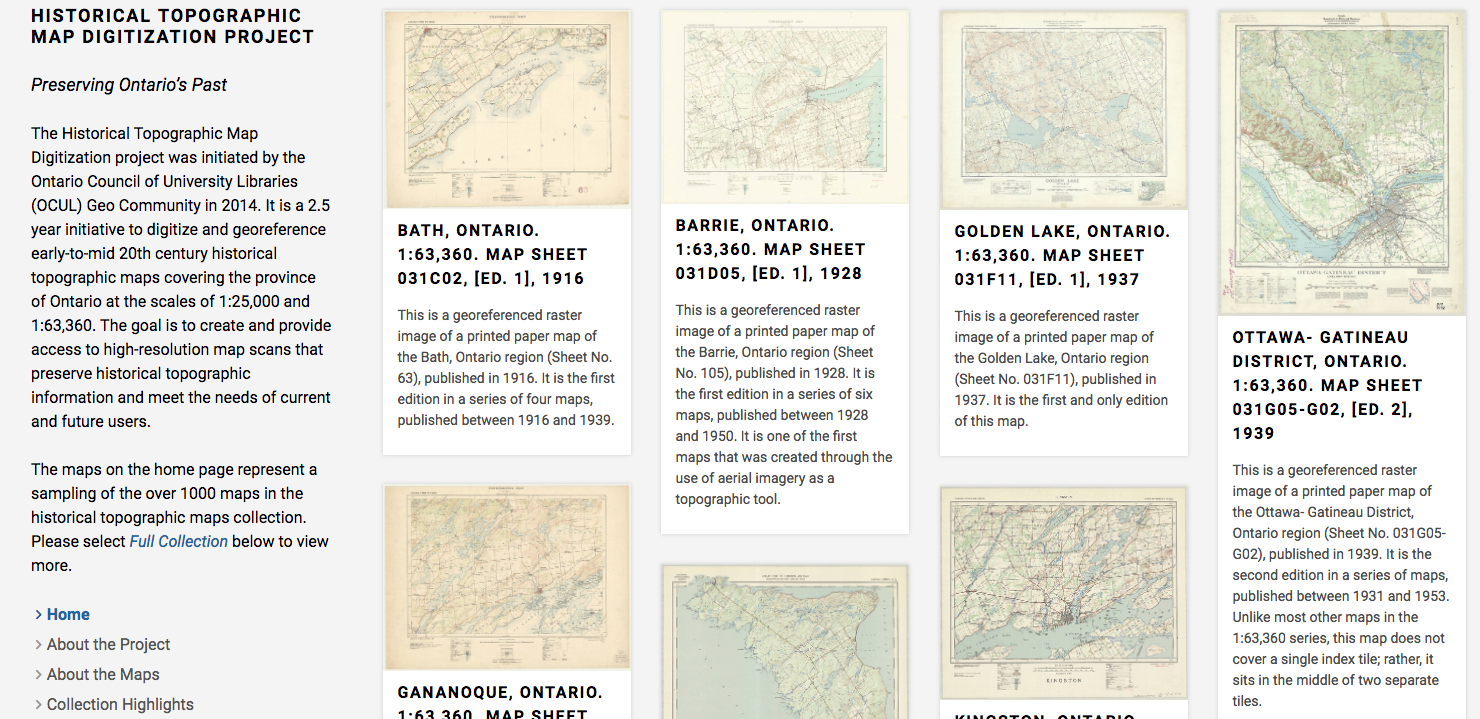
Historical Topographic Map Digitization project https://ocul.on.ca/topomaps

Archives Unleashed
http://archivesunleashed.org/

Benefits
- Performance & speed
- Less technical maintenance
- Less resource intensive
- Security benefits
- Version control
- Simple hosting options, e.g. Github pages
Drawbacks
- Learning curve
- No editing environment (but there are options)
- No dynamic elements
Markdown
Content Management
- Hugo natively supports Markdown and Emacs Org-Mode
- but there are additional formats such as asciidoc that are supported via external helpers
Introduction to Markdown
Markdown is a relatively new syntax.
The overriding design goal for Markdown’s formatting syntax is to make it as readable as possible.
The idea is that a Markdown-formatted document should be publishable as-is, as plain text, without looking like it’s been marked up with tags or formatting instructions.
Benefits
- Readable
- Durable
- Legible, easy to understand
- Supported on various content management applications
Make your own Markdown file
-
Lets practicing Markdown syntax in the browser using dillinger.io. You’ll be able to enter Markdown-formatted text on the left and immediately see the rendered version alongside it on the right.
In your browser, go to dillinger.io
Dillinger automatically creates a new document for you. You may enter a title for the document in the textbox on the top of the page if you like.
Markdown Syntax
Headings
Headings are hierarchical. Use the hash symbol.
# for h1
## for h2
### for h3
and so on...
Paragraphs & Line Breaks
If I tried to type the following sentence into a Github .md file:
Hello!

Today we'll be learning about Markdown syntax.
This sentence is separated by a single line break from the preceding one.
It would render as:
Hello!
Today we’ll be learning about Markdown syntax. This sentence is separated by a single line break from the preceding one.
Paragraphs must be separated by an empty line, so leave an empty line between syntax.
Emphasis
Lists
Snippets
Links
Images
Tables
Use http://stevecat.net/table-magic/ to make easy markdown tables!
Markdown and Github
- Markdown is used in many places in Github
- Github has its own Markdown syntax, called Github Flavoured Markdown - https://github.github.com/gfm/
- Dillinger is also integrated with Github
Hugo
- In Hugo, you would name your files as
*.mdor set markup=“markdown” in front matter.
Resources
Markdown Cheatsheet
Web Tools Comparison:
Many websites and publishing platforms also offer web-based editors and/or extensions for entering text using Markdown syntax.
| Stackedit | Dillinger | Prose |
|---|---|---|
| Sync from Github - navigate to locate files | Sync from Github - navigate to locate files | More closely integrated with github |
| Automatic commit message from Stackedit | Add your own commit message | Add your own commit message |
| Messes with your markdown: Adds extra Stackedit comment into markdown | No tampering | No tampering |
The really good Markdown tutorial that we adapted by Sarah Simpkin https://programminghistorian.org/lessons/getting-started-with-markdown
Hugo
Why Hugo?
- Speed (<1 millisecond/page)
- Less dependencies
- Built-in multilingual functionality
- Integrations (Google analytics, formspree, disqus)
Hugo folder structure
	mySiteName/
	├── archetypes
	│   └── default.md
	├── config.toml
	├── content
	├── data
	├── layouts
	├── static
	└── themes
Archetypes
Allow for the quick generation of a content type into a markdown file, such as a blog post
---
title: "{{ replace .Name "-" " " | title }}"
date: {{ .Date }}
draft: true
---
hugo new SECTIONNAME/FILENAME.FORMAT
hugo new post/2018-01-01.md
Config.toml
Defines site settings, like the url, language, meta information, which theme to use, etc.
Can be formatted at toml, yaml, or json.
	baseURL = "http://example.org/"
	languageCode = "en-us"
	title = "My New Hugo Site"
	theme = ""
Data
Data used in the website, usually formatted as yaml or json.
Layouts
- Templates for how different parts of the site will be rendered.
- Can use logic, if statements, loops, variable comparisons, mathematical operators.
- Use dot notation, e.g. .Params references params set in the config file.
{{ if isset .Params "title" }}{{ index .Params "title" }}
{{ end }}
Static
Contains any static assets, like images, CSS, or JavaScript.
When Hugo builds the site, content in this directory is copied over as-is.
Themes
Site themes
Creating a static site hosted with Github Pages
Follow along, and put up a blue sticky note if you get stuck.
We'll use this site for the exercises.
Generate your site & connect it to your git repo
Create your repository on github and copy the link
hugo new site mySiteName
cd mySiteName
git init
git remote add origin https://github.com/username/repo-name.git
git add .
git commit -m "initial commit"
git push -u origin master
Go to your repo on github, and you should see a couple of items have been added
Adding a theme
- Themes are available on the Hugo themes site at https://themes.gohugo.io/
- We're going to use the Creative Portfolio theme
cd themes
git clone https://github.com/kishaningithub/hugo-creative-portfolio-theme.git
Remove the .git folder in the theme directory so you can push it to Github later
Copy the theme's example site
cd .. (to your site root directory)
cp -r themes/hugo-creative-portfolio-theme/exampleSite/* .
See your site
hugo serve
Go to localhost:1313 in your web browser
Modify your config.toml
Add this line for Github pages hosting: publishDir = "docs"
Set your baseurl to:
https://githubUsername.github.io/repo-name/
Add your social media links under params.social, and remove any empty ones
Get some images for the site
Options are available in the github repo under 'sampleImages'
Copy the images folder to mySiteName/static/img/portfolio
Create content
In your 'content/portfolio' directory, copy the markdown files in the git repo at exampleSite/content/portfolio/
Update the markdown files if you're not using the dog images
Push to Github pages
Press CTRL+C to stop the hugo server
hugo
git add .
git commit -m "build the site"
git push
Customizing styles
Depending on the theme, customizing the theme can vary - check the theme documentation.
For this theme, create a CSS file at mySiteName/static/css/custom.css
Modifying templates
When you override a template, copy the structure from the themes directory into your root directory.
Exercises
See the README at https://git.io/vALv2
Other Tools
- Netlify CMS (https://www.netlifycms.org/)
- Migration tools